August 15, 2011

Mango & Lemon Meringue Tartlettes

I had to come home to Sydney for a few days due to a family emergency about a week ago. Gosh it was weird coming home. Mainly because it stirred alot of mixed emotions in me. Happy because I missed alot of things about home, but sad because of the occasion in which I had to come home for and that I just simply wasnt ready to come back, felt almost like my trip was being cut short. However, when I touched down in Sydney I was a bit teary from realising how long I had been gone for - 4 months, and I was ecstatically happy to be seeing loved ones so soon. I realised all the things that I took for granted and all the things that I missed about home... 90% being the food!! :D

I was supposed to stay for 2 days but ended up extending my stay for a week. I can tell you that in that one week I crammed as much food in as possible! Went to the Fish Market, Bourke St Bakery, 'The West' (its what I call the Canley Vale/Cabramatta area that I grew up in), ate pho, Thai, Jap, Korean and much, much more! lol yes I really did take advantage of being back. But I also baked alot during the day whilst every one was at work *cheeky grin*

I baked Apple and Cinnamon muffins - they were gone in a jiffy so I dont actually have any pics of it (but will make another batch when I get home and post up the recipe then). But more to the point, I made ALOT of tartlettes!

Mango Lemon Meringue Tartlettes-17

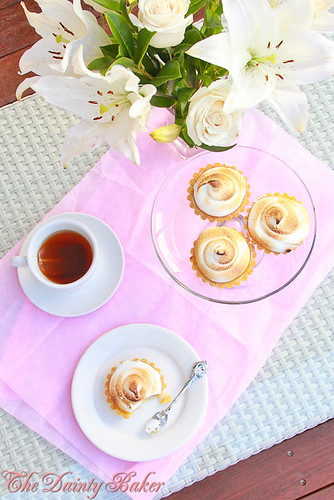
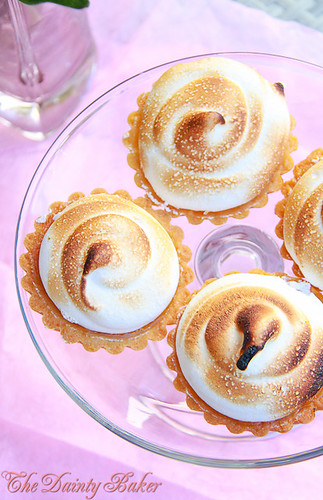
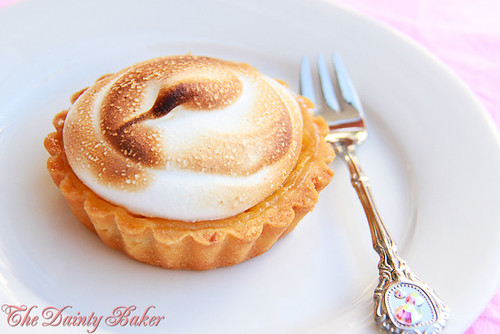
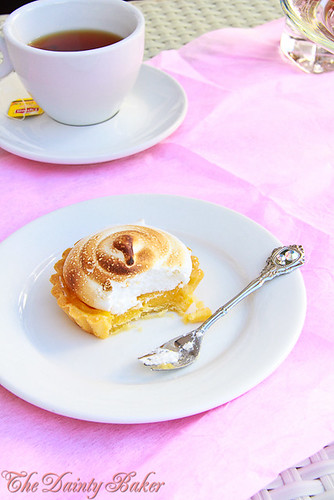
Here is one of the tarts I made, its based off one of my favourites - Lemon Meringue Pie. A few years ago I started making this dessert in little tart shells simply because I hated having to line a massive tart shell and it was easier to share this way as you didnt need to cut it up into pieces or give away your entire tart pan with it, it was just easier like this. Having been away from home for so long I rummaged through my pantry to see what I could whip up... and lo and behold! I found a can of sliced mangoes... hence my 'Mango & Lemon Meringue tartlettes'.

Mango Lemon Meringue Tartlettes-13

Mango and Lemon Tartlettes
Makes 16 small tarts

I used a simple Pâte Sucrée recipe for the base.

Filling

1/2 cup sugar
a pinch of salt
250 grams sliced mango (fresh or from the tin)
Juice of 1 lemon
zest of 1 lemon
3 egg yolks
2 Tbsp cornflour mixed with 1/4 cup juice from the can or water if you are using fresh mangoes
50 g butter

Meringue

9 egg whites
250 g sugar
1 tsp cream tartar
1 tsp vanilla essence

Grease and line all the tart shells with the pâte sucrée, make sure that it doesnt get warm ie keep it in the fridge until ready to use.

To make the filling, puree the mango then put into a pot with all the other ingredients except the egg yolks and corn starch. Let the mango mixture come to a boil and simmer until it reduces and starts to thicken. Strain and return back into the pot.

Meanwhile, mix the yolks and cornstarch in a separate bowl. Once the mango mix is ready, pour only half of mix bit by bit into the yolks whilst constantly stirring. Then pour the egg mixture back into the pot with the rest of the mango mix. Return to heat and stir constantly with a whisk until it thickens. Remove from heat then stir butter through.

Spoon the filling into each tart pan and bake for 20 mins at 180oC until the filling is set and the tart shell is slightly browned. Remove from oven, let cool a little then remove from shell tins and cool further.

Whilst the tarts are cooling, make the meringue by whipping the egg whites until it is foamy. Add sugar whilst constantly whisking, add the rest of the ingredients and whisk until it stands at hard peak. Put meringue into a piping bag and only when the tarts are completely cooled pipe swirls onto each tart. Place these tarts back in the oven at 150oC for another 10-15 mins until the meringues are baked but not dried out. The meringue should be stiff but be soft and fluffy.

Use a blow torch to brown the tops of the meringue.

Serve & enjoy!

Mango Lemon Meringue Tartlettes-6

I guess my choice was probably also influenced because we were doing 'Classical Cakes and Tarts' at school at the time. I learnt that 'fonçage' is the fancy French term to describe lining of a tart pan.

Mango Lemon Meringue Tartlettes-19

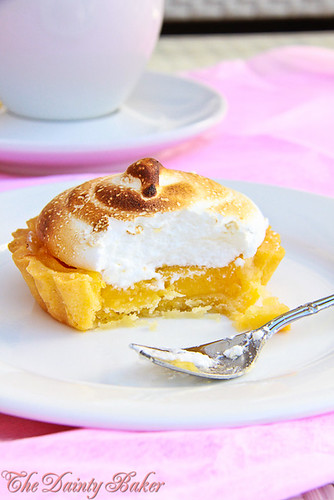
I was a little disappointed with this recipe, simply because the mango flavour was ousted by the lemonyness and it was a little on the sweet side. My thoughts at the time was, yes the mango will be a little sweet especially paired up the meringue, but if I use more lemon juice then that should bring up the acidity. To my dissappointment, too much I think.

Mango Lemon Meringue Tartlettes-16

Next time, I will reduce the mango down further, decrease the sugar content (use only 1/4 sugar) and therefore the need for lemon juice. However, this being said, it was still really nice tasting. Sweet, with a tart aftertaste and a hint of mango.

Mango Lemon Meringue Tartlettes-20

ps. Isnt my little fork too cute?! Got it in Japan. I ♥ Japan!!

Mango Lemon Meringue Tartlettes-21

'I'm such a 'tart' for tarts!'

August 10, 2011

Wedding Cake Finals

This was a stressful 2 days... it was our Wedding cake class final but reminisced something more like a scene from a horrible 'Masterchef' challenge. We had to bake one tier from scratch (including torting and icing), stack with the 2 other dummy tiers and decorate the whole 3 tiers within 10 hrs.... AHHHH!!

Wedding Cakes-16

There were 3 themes with a whole bunch of requirements:

1. Abstract Nature
2. Modern Geometric
3. Classical

The one that I got given was Abstract nature. I had to come up with a design and execute it within that 10 hr time frame, with the requirements of using complimentary colours in my design, displaying 5 different techniques used, use of fondant, neat borders etc etc.

Wedding Cakes-19

Being the over enthusiastic crazy child that I am, I got a little carried away with my design. But to be fair, I wanted to push myself too which is why I didnt go with the A - Typical design of having flowers and in particular, blossoms and branches cascading down the cake, even though that would have been slap bang on the requirements and quite easy to do, as you can just punch out mass amounts of blossoms quite quickly.


Wedding Cakes-67

I decided to mix modernism with the classic look as I'm a real fan of understated elegance, theres something about the simplicity yet delicacy of that look that really appeals to me. In the design I had elegant swirling patterns to symbolise the branches which also formed part of a lace pattern. Gumpaste flowers of different sizes were scattered off this detailed and smaller blossoms were also used to add a finishing touch to the overall look of the cake.

Wedding Cakes-66

The topper for the cake was a bouquet of the larger gumpaste flowers as it helped to tie in the other flowers scattered over the cake. The second tier also had handmade pearls as a touch of opulence. I know that the flowers might look like I got a little carried away with the petal dust and decided on all colours of the rainbow but it actually was very meticulously thought out! My favourite colour is purple so originally I started with this and yellow (as they are complimentary colours). But I thought to myself that it was a little boring just having two colours so I threw in some pink, which is on the same side of the colour wheel as purple so that would work. Now this looked good but it was a little 'flat' there was no dimension in the fact that it all the colours were too similar almost, so I decided to throw in a touch of apple green and thats when the flowers came to life! Really pays to know your colour wheel and how the colours work together :)

Wedding Cakes-10

Wedding Cakes-64

So how did I go? ... Here were the turn of events over the 2 days...

Day 1: Baked the real cake and made all the icings (buttercream and royal). The cake cooled in time so I was able to torte and fill with buttercream then ice the entire tier with the crumb coat. I enrobed the 2 dummy cakes and started making the gumpaste flowers, as you need to let this harden for at least a few hours before painting with petal dust. I coloured the fondant and managed to punch out the little blossoms, of course I did not know how many I would need so I made 50 of each colour. I also made the fondant pearls. I stacked the two dummy cakes together and started on the decorations that needed to be attached onto the cake too. All this in 5 hrs isnt too bad... but heres where the rush begins....

Wedding Cakes-50

Day 2: I continued to make and attach decorations onto the cake. This was very time consuming but not as much as painting the flowers. All the different colours made the painting process a long one. I had to apply one colour at a time and with the right pressure and intensity so it didn't look like a paintball job! lol

Wedding Cakes-24

Then the time came to stack the cake. This caused me alot of grief and was when the first lot of problems or 'challenges' started. As the bottom tier was the real cake and the two above were the dummy cakes, it had shrunk during the baking process both in width and height. Chef (thats what we call our teacher) didnt take this into account and so as a result the top two dummy cakes were bigger than the bottom tier, especially with the middle tier being a square, it looked awkward. I thought, oh thats fine I'll just attach the square tier off centre and pipe stringwork in the corners. So I was along my happy merry little way until I actually stuck the dummies on. Now because the weight of these dummies were next to nothing. It left a massive gap between the bottom tier and the second tier. Gosh that annoyed me to no end. I tried to push it down, even went as far as placing weights on the top to push it down but it just wouldn't budge. In the end I had to improvise and make a pretty little border around the bottom of the second tier to cover the gap.

Wedding Cakes-15

Attaching the flowers onto the cake were a bit of a drama too because they were on the side and the flowers were quite heavy, it wouldn't stay... it wasn't feasible for me to wait for the glue (royal icing) to dry because that would not only take ages but I also don't have that many hands... so what to do? Tooth picks! Yes, thats right! I stuck tooth picks into the cake underneath the flower and balanced it on there until it dried! Perfecto! In no time at all I had a bunch of toothpicks sticking out of my cake like a bommyknocker, but hey it worked!

Wedding Cakes-23

Next was the string work, I had to pipe the 'lace' between the swirls. This was always going to be a tough challenge. It took me ages to get right and to pipe straight is really really really hard. But thankfully I got it done :) The suspended stringwork in the corners also gave me some grey hairs. I would pipe the first lot on then when I went to add to it they would break, let me tell you there were quite alot of "F's" and "S's"

Wedding Cakes-18

Eventually, I finished it off with piping a bead border, details on the swirls and insides of the little blossoms. I also used white shimmer dust on the swirls and the pearls (HA that rhymes!)

Wedding Cakes-17

I still cant believe I was able to finish this under the pressure and amount of time we were given. But I guess I worked with what I had and I have to say, I'm pretty happy with the out come :)

Wedding Cakes-18

Wedding Cakes-20
The wedding cake monster! RAHHH!!

Wedding Cakes-74
These were the rest of the other cakes in the class ♥

Wedding Cakes-69
For more detailed pics, check out The Dainty Baker page on Facebook - LIKE

LinkWithin

Related Posts Plugin for WordPress, Blogger...